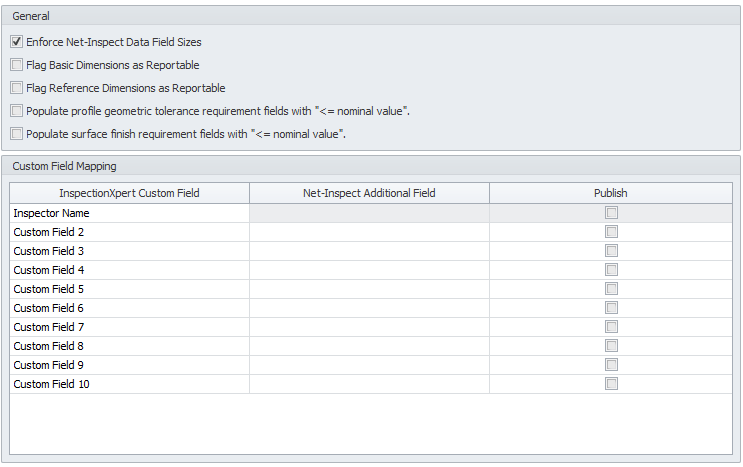
Net-Inspect users have additional customization option in InspectionXpert. Th Net-Inspect Options tab enables user to map up to 4 custom fields from InspectionXpert to Field 14 in Net-Inspect.
Map Custom Fields to Net-Inspect
1. First identify the custom field you wish to map to Net-Inspect and modify the field name and any desired values using the topic Customize Lists.
2. Click the Options icon on the Home tab.
3. Click the Net-Inspect Options tab.
4. Check the Enforce Net-Inspect Data Field Sizes box if you are a Net-Inspect user as this will automatically truncate values in certain fields to fit the corresponding maximum field sizes in Net-Inspect. NOTE: This checkbox will help ensure data is published correctly to Net-Inspect.
5. Check the option for both Flag Basic Dimensions as Reportable and Flag Reference Dimensions as Reportable if you wish to either allow measurements to be reported in Net-Inspect or not.
•When either of these options are checked Net-Inspect will allow measurements to be published along with the FAI report. When either of these options are unchecked Net-Inspect will display Non Reportable for any basic and/or reference dimension.
6. When the Populate profile geometric tolerance requirement fields with "<= nominal value". check box is checked, the nominal value will populate this Net-Inspect field as "<= nominal value"
7. When the Populate surface finish requirement fields with "<= nominal value". check box is checked, the nominal value will populate this Net-Inspect field as "<= nominal value"
8. Enter the InspectionXpert Custom Field(s) you want to map to Net-Inspect under "InspectionXpert Custom Field".
9. Enter the name you want to have appear in Net-Inspect as the field label under “Net-Inspect Additional Field”.
10. Click OK to save changes.
