Define Specifications
The Specifications tab in the Table Manager is used to capture detailed information from your Specifications that can then be mapped to the AS9102 Form 2 report. These fields are also available in the Template Editor window and can be mapped to any custom report form. Data can be entered into the Specifications tab one record at a time as described in the Define Table section, or users can import a Specifications list from a .csv file or extract the entire table of data from the file at once.

To begin defining a Specification:
1.Open an existing inspection project and click the Specifications tab on the Table Manager, which displays the Specification window.
2.Click the ![]() button, which allows you to enter values in the Specifications window.
button, which allows you to enter values in the Specifications window.
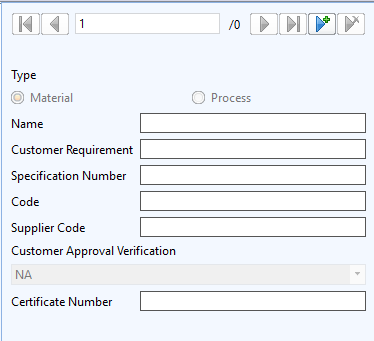
3.Click a Type option.
4.Click the ![]() camera icon to use the OCR to capture the information to place in the text boxes OR type a value in the text box.
camera icon to use the OCR to capture the information to place in the text boxes OR type a value in the text box.
5.Click OK, which adds the information to a row on the Specification tab.
If you have a list of Specifications in an electronic (.csv) format you can import all the records at once into the Specifications tab in InspectionXpert. The data in your .csv file must be formatted properly to ensure it will be added to the correct fields in your Specifications tab. InspectionXpert has provided a sample template for your use in formatting your Specifications data so that it will import accurately.
•Specifications-All Fields Example.csv - provides a template of all Specification fields (Type, Name, Specification Number Code, Supplier Code, Customer Approval Verification, Certificate Number) and includes a header row listing the field labels. The row/record containing the field labels will need to be deleted from the Specifications tab after import.
This template can be found in the following folder: C:\Users\Public\Documents\InspectionXpert\InspectionXpert OnDemand 2.0\Templates
1. Open the Specification template listed above.
2. Cut and paste data from your electronic list of Specifications into the InspectionXpert Specifications Template to match the field order in the template.
3. Click Save to save your changes to the Specifications template (NOTE: be sure to save the file as a .csv).
4. Open an existing inspection project and click the Specifications tab on the Table Manager, which displays the Specifications window.
5. Click the Import button, which opens the Open window.
6. Search for and select the .csv file that you wish to import.
7. Click Open, which imports the Specification information into Specifications table.
1. Click the ![]() button which opens a blank Property Table Extraction window on the left.
button which opens a blank Property Table Extraction window on the left.
2. Click and drag around the entire table in your file (not including the header data in your table)..png)
3. InspectionXpert will attempt to interpret your table data and add it to the Property Table Extraction window.png)
4. Right click on each column header in the Property Table Extraction window to map column data to the correct field..png)
5. Click inside the extracted table in the Property Table Extraction window to edit individual values of the table or see the Modify Table section for options on editing values in the table.
6. Click OK to save data to your Specifications Table
•Using the arrow keys at the top of the Specification window, you can review each row in the table.
•Edit the values of a given row by changing the data in the fields in the Bill of Material Properties window on the left.
•To remove a row, click on or arrow to a row and then click the ![]() button or click the Delete button the tab in the Table Manager.
button or click the Delete button the tab in the Table Manager.