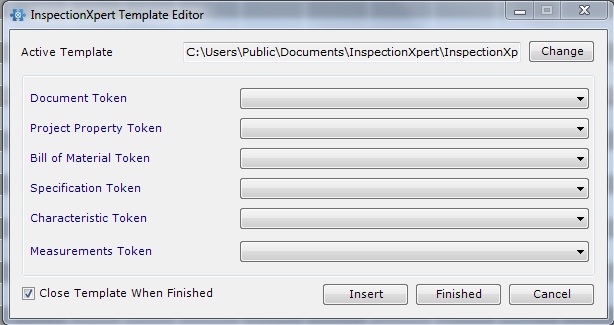
The Template Editor provides a way to change which data should be mapped from your inspection project to your inspection report. This can include project properties such as file name or revision, custom properties from your file, and properties of your inspection characteristics such as inspection process, method, upper and lower limits and many other data elements as listed below.
To open the template editor:
1.Click File to open the InspectionXpert OnDemand 2.0 menu.
2.Click Template Editor on the menu, which displays the Select the inspection sheet template window.
3.Click the excel template you wish to edit.
4.Click Open, which opens the InspectionXpert Template Editor dialog box and Excel with the selected template.

To change to a different active template:
1.Click Change to specify a different report template.
NOTE: To use your company's own Excel report, you must first save it as an Excel Template (.xlt) to open it with the Template Editor.
2.Click the template you wish to edit.
3.Click open, which changes the Active Template path in the Template Editor.
NOTE: Only one template can be active at a time.
The Template Editor opens within the Microsoft Excel, so any functionality that exists in Excel can be used to format your template and add powerful automation and error-proofing. For example you can use
1.After launching and selecting a template, you can modify the template in Excel and map tokens to your template.
2.If you have created any custom fields or custom properties in your inspection project, these fields will now be available for you to map to your report template.
3.Use excel to make modifications to the template, such as changing color, font, borders, adding images such as logos or adding more advanced functions such as conditional formatting, formulas, macros, lookup tables, etc. NOTE: All of the functions that work in Excel work in the template.
4.InspectionXpert also has a feature to Create a Footer Row that will add rows or truncate rows in your report based on the number of values in your inspection project.
5.Click Finished once you have completed all of your changes and wish to close the Template Editor, which displays the Save your inspection sheet template.
6.Click an existing template to save over the existing template OR type a new name in the File name text box to add a new template.
7.Click Save.
Additional Template Editor Functions
Click the Close Template When Finished checkbox to have InspectionXpert close your Excel template when you click the Finished button.
Click the Cancel button to cancel your template editing session and not save your changes.
Customize Your Own Reports for use with InspectionXpert
If you have your own Excel reports that were already created and you want to use them in InspectionXpert, follow these steps:
1.Open you existing report with Excel and save it to an Excel Template (.xlt, .xltx) format.
2.Launch the Template Editor and navigate to your saved report in Excel Template format.
3.Use the Template Editor window to begin mapping tokens into your report format.
4.InspectionXpert also has a feature to Create a Footer Row that will add rows or truncate rows in your report based on the number of values in your inspection project.
5.Click Finished and enter a name for your new template.
6.Click Save.
7.Open your Inspection Project, click the Home tab, and then click ![]() .
.
8.Click ![]() in the Excel Export window and navigate to your new saved report, and click Open, which displays the new report in your list of reports.
in the Excel Export window and navigate to your new saved report, and click Open, which displays the new report in your list of reports.
9.Click the Active button next to your newly added report and then click Export.